Binding
Off: Intermediate and Advanced Techniques
____________________________________________________________________________
Binding
Off: A Fitting End by Ann Budd
At
some point, all knitting must come to an end and the stitches must be removed
from the needles. This can occur at the end of a project when all of the
stitches are bound off, or along shaped edges, such as armholes and
necklines. Over the centuries, knitters have devised a number of ways to
secure the final row of knitting, while producing an edge that is elastic and
flexible.
Following
are several ways to bind off stitches, each with advantages. For best
results, all bind-offs should be worked with even tension to produce an
elastic edge that will stretch with the knitted fabric below it. If worked
too loosely, the edge will flair and look sloppy. Worked too tightly, the
edge will fray and eventually break, especially along edges that are subject
to stretching such as necklines. To prevent an overly tight bind-off, use a
needle one (or more) sizes larger than the one used for the body of the
project.
End
each of these bind-off techniques by cutting the yarn and pulling the
tail through the last stitch.
Standard
Bind-Off
This
is the most common, and for many knitters, the only method for binding off. Use this method for edges that will be sewn into seams or
finished in some way (such as stitches being picked up and knitted). Slip 1
stitch, *knit 1 stitch, insert left needle tip into first stitch on right
needle (Step 1), pass this stitch over the second stitch (Step 2), and off
the needle—1 stitch remains on right needle and 1 stitch has been bound off
(Step 3). Repeat from *.
Suspended
Bind-Off
This method is similar to the standard bind-off but produces a more elastic edge. Use this method when you want to ensure against a tight bind-off edge. Slip 1 stitch, knit 1 stitch, *insert left needle tip into first stitch on right needle and lift the first st over the second (Step 1), leaving the first stitch on the left needle, knit the next stitch (Step 2), then slip both stitches off the left needle—2 stitches remain on right needle and 1 stitch has been bound off (Step 3). Repeat from * until no stitches remain on left needle, then pass first st on right needle over the second.
Invisible
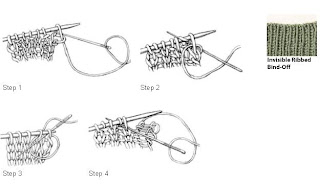
Ribbed Bind-Off
This
method produces a rounded edge that is extremely elastic. It follows the k1,
p1 rib and is ideal for neckbands. Work
this bind-off with a tapestry needle. Cut the yarn three times the width of
the knitting to be bound off, and thread onto a tapestry needle. Working from
right to left, insert tapestry needle purl wise (from right to left) through
the first (knit) stitch (Step 1) and pull the yarn through, bring the
tapestry needle behind the knit stitch, insert it knit wise (from left to
right) into the second (purl) stitch (Step 2) and pull the yarn through, *use
the tapestry needle to slip the first knit stitch knit wise off the knitting
needle, insert tapestry needle purl wise into the next knit stitch (Step 3)
and pull the yarn through, slip the first stitch purl wise off the knitting
needle, then bring the tapestry needle behind the knit stitch, insert it knit
wise into the next purl stitch (Step
4), and pull the yarn through. Repeat from *.
Sewn
Bind-Off
This method, popularized by Elizabeth Zimmermann, forms an exceedingly elastic edge (so it's great for toe-up socks!) that has a ropy appearance, much like a purl row. Work this bind-off with a tapestry needle. Cut the yarn three times the width of the knitting to be bound off, and thread onto a tapestry needle. Working from right to left, *insert tapestry needle purl wise (from right to left) through the first two stitches (Step 1) and pull the yarn through, bring the needle knit wise (from left to right) through first stitch (Step 2), pull the yarn through, and slip this stitch off the knitting needle. Repeat from *.
From: Knitting
Daily (www.knittingdaily@interweave.com) Mon,
November 23, 2009 12:28:27 PM
|
Welcome To Yarn Cat Crafts Blog Site
Welcome to Margaret's Yarn Cat Crafts Blog Site! Any type of Art or Craft discussions, comments, questions, information sharing, suggestions, and pictures - all welcome! "Unleash Your Creative Side!"
Please visit my new website Blog on
http://www.yarncatcrafts.com/shopblogslistings.asp
Search This Blog
Monday, April 9, 2012
Knitting Techniques: Binding Off
Originally Posted on Saturday, November 13, 2010
8:17 PM
Subscribe to:
Post Comments (Atom)


No comments:
Post a Comment